Home Assistant backups in 2026: a 3-2-1 plan that actually restores
- News
 Andrea R.
- Maison connectee
- Published
- 0
The short answer: turn on automatic backups in Home Assistant, download the emergency kit and store it outside the box, keep at least one copy off the device and one copy off-site, and run a test restore before you need one. Everything else in this guide is how to do that well on Home Assistant 2026.11.
Why this matters now: the backup system is no longer a bare “create snapshot” button. It encrypts by default, pushes copies to more than a dozen storage integrations, and — since Home Assistant 2026.11 — can write to a local USB or internal drive. That is a lot of options, and most people still keep their only backup on the same SD card that is about to fail.
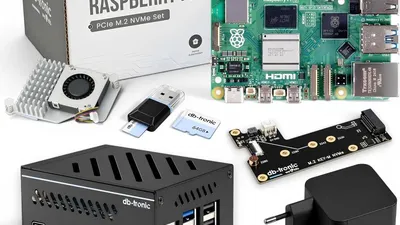
Andrea R. runs Home Assistant on the Raspberry Pi 5 kit we tested. The one weak point we flagged in that test was the bundled 64 GB microSD card, which we replaced with an NVMe SSD for 24/7 use. That swap is exactly the moment a good backup plan pays off, and it shaped the recommendations below.
Key takeaways
- Home Assistant backups are encrypted by default. Without the key from the emergency kit, an encrypted backup cannot be restored — and Nabu Casa does not keep a copy of your key.
- The Recommended setup backs up daily (everything except media, the share folder and local apps), keeps the last 3, and stores them on the system plus Home Assistant Cloud if you are signed in.
- Home Assistant Cloud (now sold as Home Assistant Link, $6.50/month or $65/year in the US) stores one backup of up to 5 GB, replaced at each upload.
- Free off-site options exist: Google Drive, OneDrive, Dropbox, Cloudflare R2 (10 GB-month free tier), WebDAV or SFTP to your own server.
- A restore on Home Assistant OS needs internet access, at least 2 GB of free storage and a healthy system. A large restore can take about 45 minutes.
The Rocks plan: three copies, two places, one tested restore
The classic 3-2-1 rule (three copies, two media, one off-site) maps neatly onto Home Assistant. Here is the setup we recommend for a typical home on Home Assistant OS.
- Copy 1 — on the device. Keep local automatic backups. They are the fastest way back after a bad update or a broken automation edit.
- Copy 2 — another device at home. A NAS share over SMB/NFS, or, since 2026.11, a USB drive added as Local disk. This saves you when the boot media dies.
- Copy 3 — off-site. Home Assistant Cloud if you already pay for remote access, or a cloud bucket/drive if you don't. This saves you from theft, fire, or a power surge that takes the NAS with it.
- The key — in two places that are not Home Assistant. A password manager entry and a printed copy of the emergency kit.
- The test — once a quarter. Restore the latest backup onto a spare device or virtual machine. A backup you have never restored is a hypothesis.
Our opinion: steps 4 and 5 are the ones people skip, and they are the ones that decide whether a dead SD card costs you an evening or a month of rebuilding automations.
Which failure does each copy cover?
Instead of comparing storage brands first, start from what can go wrong. This table is our analysis of the failure modes described in the official backup documentation.
| What breaks | Local backup | Second device at home | Off-site copy | Emergency kit needed? |
|---|---|---|---|---|
| Bad update or broken config | Yes — fastest | Yes | Yes | Only if you restore from another system |
| SD card / SSD failure (“I/O error”, read-only file system) | No — it is on the dead disk | Yes | Yes | Yes |
| Hardware replaced (Pi → Green, mini PC) | Only if downloaded first | Yes | Yes | Yes |
| Theft, fire, surge hitting the whole rack | No | No | Yes | Yes |
| Lost encryption key | No copy helps if the backup is encrypted and the key is gone | That is the point | ||
The documentation is blunt about the dead-disk case: if all your backups are stored locally and you cannot reach Home Assistant, you cannot get those backups through Home Assistant. On a Pi, that usually means pulling the card and hoping.
Step by step: set up automatic backups correctly
1. Download the emergency kit first
Go to Settings › System › Backups and select Set up backups. The first step is the encryption key. Download the emergency kit — a text file named like home_assistant_backup_emergency_kit_<date>.txt — and store it outside Home Assistant.
The emergency kit documentation explains that current backups use SecureTar version 3, with XChaCha20-Poly1305 encryption and an Argon2id-derived key. In plain terms: strong encryption, and no back door. The key is seven groups of four characters separated by hyphens. If you ever change it, keep the old kit too, because older backups still need the old key.
2. Choose Recommended or Custom
Recommended is a good default for most homes. Pick Custom if you want more history or more locations. In Custom mode, we suggest:
- Schedule: daily.
- Retention: 7 backups locally, fewer on paid cloud storage if size matters.
- Data: settings, history and apps; leave out media and the share folder unless you really need them. The docs warn that large backups also take longer to restore.
3. Pick a time that does not fight the database
This detail causes many “Could not lock database within 30 seconds” failures. By default the Recorder purges old data every night at 04:12 and repacks the database on the second Sunday of each month. The System optimal backup time starts between 04:45 and 05:45, and a long repack can still be running.
If automatic backups fail, set a custom time later in the day — and make sure every backup location (your NAS, for example) is awake at that time.
4. Get alerted when a backup fails
The Backup integration exposes an event entity and sensors. Build a simple automation that notifies your phone when the last automatic backup fails. 2026.11 also added a Last successful automatic backup size sensor, useful to spot a backup that suddenly balloons because of a camera folder.
For unusual schedules, the backup.create_automatic action lets you trigger a backup from any automation — for example, wake a NAS, wait until it is online, then back up.
Where to store backups: off-device and off-site options
Each location is an integration you add once; it then appears as a toggle in the backup settings. Free tiers and prices below were checked on vendor pages on 9 November 2026.
| Location | Where data lives | Cost to start | Since HA | Rocks note |
|---|---|---|---|---|
| Network storage (SMB/NFS) | Your NAS | Hardware you own | — | Best copy 2 on HA OS |
| Local disk (USB / internal) | Same house, separate drive | A USB drive | 2026.11 | Simplest copy 2 on a Pi |
| Home Assistant Cloud | Nabu Casa cloud | $6.50/month (Link) | — | One backup, max 5 GB, always encrypted |
| Google Drive | Google cloud | 15 GB shared with Gmail/Photos | 2025.2 | Needs OAuth credentials at setup |
| Cloudflare R2 | Cloud bucket | 10 GB-month free tier | 2026.2 | Free egress; our pick for copy 3 without Link |
| Backblaze B2 | Cloud bucket | From $6.95/TB/month | 2025.12 | Use its own integration, not the AWS S3 one |
| Dropbox | Dropbox cloud | 2 GB on Basic | 2026.4 | Tight for history-heavy setups |
| WebDAV / SFTP Storage | Your own server | Your server | 2025.3 / 2025.10 | Good for Nextcloud or a friend's box |
Two traps worth knowing. First, the AWS S3 integration is meant only for Amazon S3; the docs say S3-compatible providers like Wasabi or Backblaze B2 are not supported through it. Use the dedicated Backblaze B2 or Cloudflare R2 integrations instead. Second, the WebDAV docs flag Yandex Disk as unsupported and pCloud as unstable for backups.
On cost, Cloudflare's R2 pricing page lists 10 GB-month of free Standard storage with free egress, which is enough for several backups as long as you keep media out of them.
What a backup does not contain
Many restore surprises come from assuming “full backup” means everything. According to the docs, a backup never includes:
- log files such as
home-assistant.log; - caches and temporary files, including the text-to-speech cache;
- older backups stored in the
backupsfolder; - an external MariaDB or PostgreSQL database running on another machine — back that up with its own tools.
On Home Assistant Container (Docker), a backup holds only settings and, optionally, history. Apps, media, share folders and network storage are Home Assistant OS features.
Restoring: what has to be true before you start
On Home Assistant OS, a restore — including one during onboarding on new hardware — only starts if the system is online (it checks checkonline.home-assistant.io), has at least 2 GB free and is healthy. Offline installs cannot start a restore, which is worth knowing if you block outbound traffic.
When migrating, the backup file size is misleading. Check Disk used under Settings › System › Repairs › System information on the old system: the new device needs more space than that, plus 2 GB. Plug your Zigbee or Z-Wave radio into the new device before restoring. If the new machine has a different Zigbee radio built in, you will need a Zigbee migration — our ThirdReality Zigbee test shows why a USB coordinator you can move between machines is convenient.
During the restore, the page shows “Not found”. That is normal: Home Assistant shuts down while the backup is unpacked. Do not unplug anything. You can follow progress in the Observer at http://homeassistant.local:4357. The docs estimate about 45 minutes for a large installation, and 2026.11 removed the temporary full copy during restore, which saves space and time.
Who is this for? Our recommendations by profile
The right plan depends on what you run and what you already pay for. Here is the Rocks take.
Beginner on a Raspberry Pi with an SD card
Your biggest risk is the card itself — it was the weak point in our Pi 5 kit test. Use Recommended, add a USB drive as Local disk on 2026.11, add Google Drive or R2 for off-site, and plan the move to an SSD. The “I/O error” and “Read-only file system” messages in the docs are a warning to act on today, not next month.
Home Assistant Green or mini PC owner with Link
You already have an off-site copy. Because Home Assistant Cloud keeps only the latest backup, add a second destination with retention — a NAS share — so that one bad backup cannot overwrite your only good one.
Docker / Container user
Home Assistant backs up configuration and history only. Back up your compose files, volumes for other services, and any external database separately.
Coming from Homey or another hub?
If you are weighing platforms, read our Homey Pro vs Home Assistant decision guide. Backup and restore is one area where Home Assistant asks more of you — the tools are excellent, but you must configure them. More context in our Home Assistant guide, and keep the OS up to date as explained in our HA OS 18.4 security update guide.
FAQ
Do I need a Nabu Casa subscription to back up off-site?
No. Google Drive, OneDrive, Dropbox, Cloudflare R2, Backblaze B2, WebDAV and SFTP all work without it. Link is the most convenient option because it can restore directly from the onboarding screen, but it keeps only one backup.
Can I restore a Raspberry Pi backup onto a Home Assistant Green or a mini PC?
Yes. The official docs state the target can be a different device type. Install Home Assistant on the new device, then choose the backup at the welcome screen. You will need the old login credentials and the emergency kit.
I lost my emergency kit. Are my backups gone?
If Home Assistant still runs and you never changed the key, you can download the kit again from the Encryption key card. If the system is dead or the key was changed, encrypted backups made with the lost key cannot be restored.
Why is my backup suddenly huge?
Usually the database or media. Check the estimated database size in System information, reduce purge_keep_days or exclude chatty entities, and keep camera recordings out of the backup.
Should I turn encryption off for my NAS copy?
You can, per location. We keep it on: a backup holds tokens, passwords and a map of your home. The small inconvenience of the key is worth it.
Byline: Andrea R. — recommendations based on running Home Assistant on our tested Pi 5 kit and on the official Home Assistant documentation (version 2026.11).
Disclosure: the Raspberry Pi 5 kit was tested hands-on by Rocks on Galaxy. Backup and restore procedures, encryption details and integration availability come from official Home Assistant documentation as of 9 November 2026; storage prices from vendor pages on the same date and may change. No commission links in this article; Rocks has no affiliation with Nabu Casa, Cloudflare, Backblaze, Google or Dropbox.
Tags :
- Home Assistant
- Backup
- Raspberry Pi
- Nabu Casa
- NAS
- Self hosting
- Smart home